The Edkins Group - Zoho Experts to Help Your Business Grow
  • Knowledge
    • Zoho Masters
    • Learn >
      • Zoho Video Tutorials >
        • Client Calls
        • Zoho Books Videos
        • Zoho Creator Videos
        • Zoho CRM Videos
        • Zoho Projects Videos
        • Zoho Sign Videos
      • Virtual School >
        • Get a Free Course
  • Pricing
  • Zoho
    • End to End Small Business System
    • Small Business Accounting
    • App Demo Pages >
      • Calendar Scheduling
      • Web Tracking and Chat
      • Maximize Your Website
      • Online Meetings
      • Email Campaigns
      • Social Media
      • Customer Tracking
      • Sale Team Motivation
      • Customer Help Desk
      • Accounting
      • Project Management
      • Agile Management
      • Email
      • BI / Analytics
      • Note Taking
      • Instant Messaging
      • Surveys
      • Train Your Team
      • Staff Recruiting
      • File Sharing
    • Start Your FREE Trial
  • AirCall

News, Features and Tutorials

Learn how to maximize the most integrated online platform
designed ​to maximize your small business today.

How to merge field information after Zoho Form submitted

1/2/2020

Comments

 
Picture
The above question came through today.  We hope we provide a helpful answer.  Our goal is to help as many of you as possible feel more empowered with the Zoho platform.

If you were not aware, Zoho Forms allows you to direct the person that submits information in a form to a landing page you choose.  That is nice.  What is even nicer, is it allows you to send information that was entered into the form to the landing page.  In this video we answer the question by showing how you can set this up with Zoho Forms, a website and some basic Javascript.

We simply implemented the 'redirect' setting within Zoho Form and included a few parameters when sending it to the thank you web page.

Click below to watch the answer demonstrated like you're looking over our shoulder:
Picture
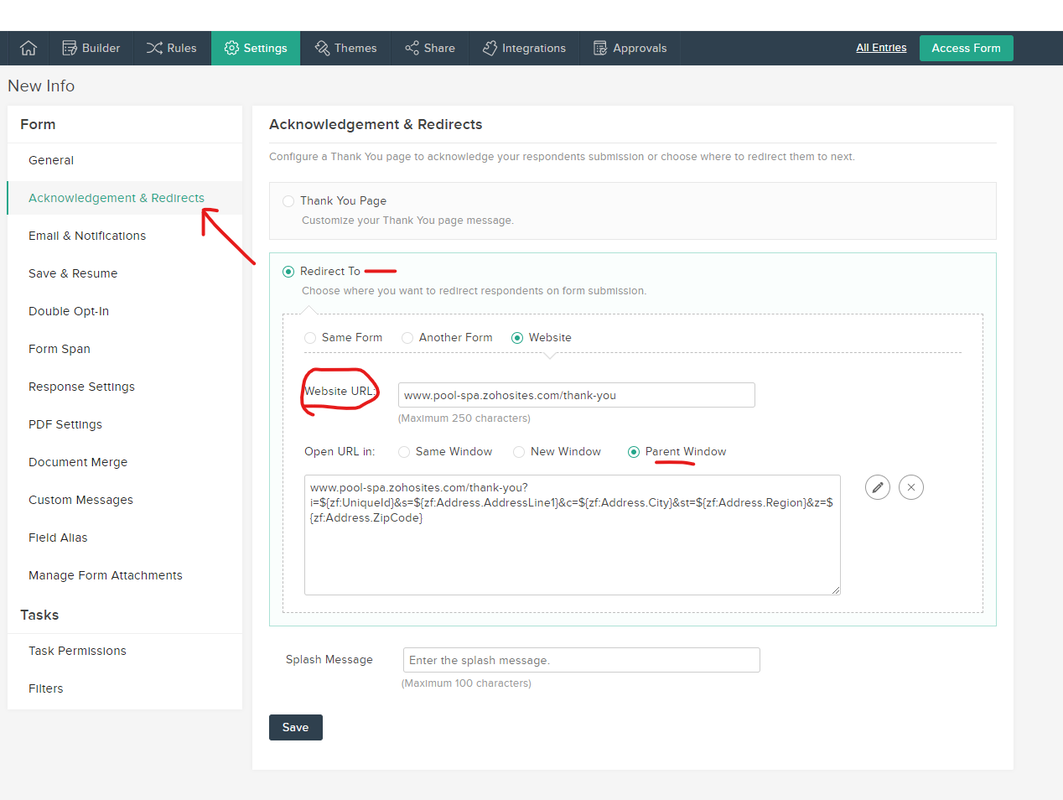
Good news is you do not have to know how to type the code "www.pool-spa.zohosites.com/thank-you?i=${zf:UniqueId}&s=${zf:Address.AddressLine1}&c=${zf:Address.City}&st=${zf:Address.Region}&z=${zf:Address.ZipCode}". 

Just click the little pencil next to it and you'll see the following:
Picture
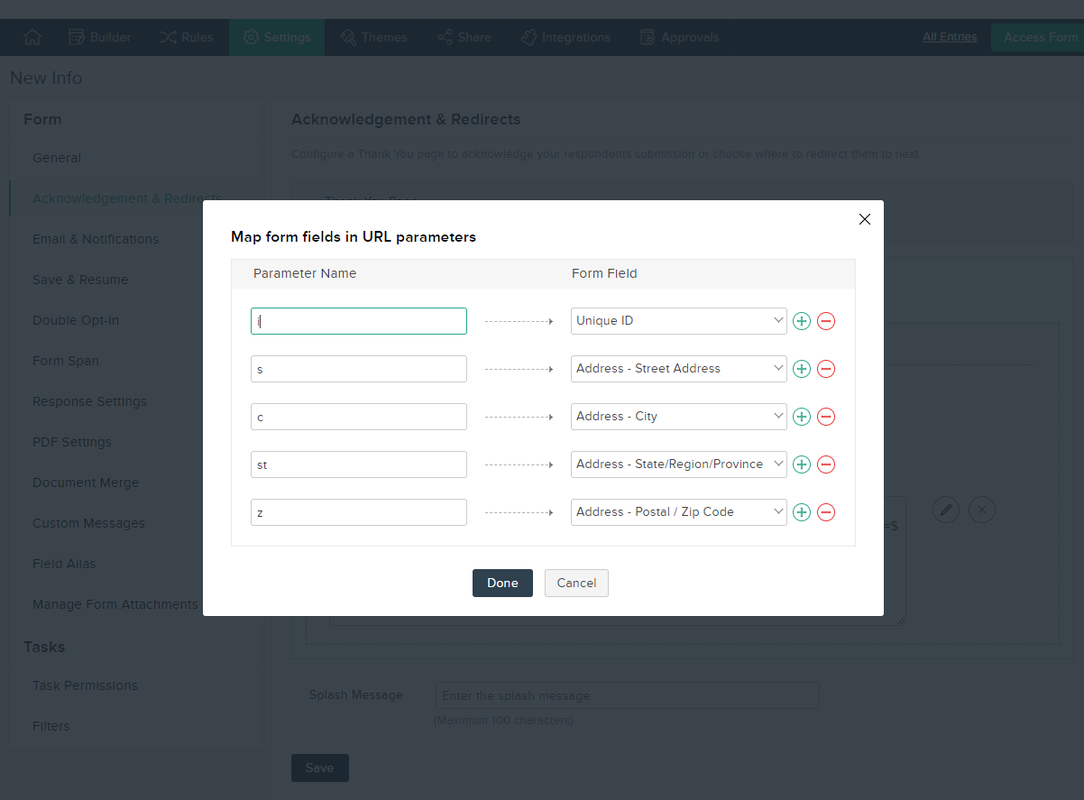
Then its just a matter of selecting the fields you want to include from the form in the dropdowns on the right side.  The left side lists the "parameters" you use in the web address.

Once someone completes the form you would see a web address like this:
http://pool-spa.zohosites.com/thank-you?i=R-52648919&s=123+Main+St&c=Anaheim&st=CA&z=92802
You then use that to pull in the "parameters" to the web page.  Below you will find the javascript used in the video to pull in the information.
go to zocademy to learn more

The Javascript used in the video:

<script>
function getQueryVariable(variable)
{
       var query = window.location.search.substring(1);
       var vars = query.split("&");
       for (var i=0;i<vars.length;i++) {
               var pair = vars[i].split("=");
               if(pair[0] == variable){return pair[1];}
       }
       return(false);


}
function myFunction()
{
var thez = getQueryVariable("i");
document.getElementById("id").innerHTML = thez.toString();

var thestreet = getQueryVariable("s");
document.getElementById("street").innerHTML = thestreet.toString().replace(/\+/g," ");

var thecity = getQueryVariable("c");
var thestate = getQueryVariable("st");
var thezip = getQueryVariable("z");
var thereplacedcity = thecity.toString().replace(/\+/g," ");
var thecitystatezip = thereplacedcity.concat(", ",thestate,"  ",thezip);
document.getElementById("city").innerHTML = thecitystatezip;
}
</script>
<body onLoad="myFunction()">
<div style="text-align:center">
<div style="display:inline-block;width:300px">
<div style="padding:10px;font-size:2em;margin-top:20px;text-align:center">
Personal ID
</div>

<div style="font-size:2em;color:green;font-weight:bold;line-height:1.25em;text-align:center" id="id">
</div>
</div>
<div style="display:inline-block;width:300px">
<div style="font-size:2em;margin-top:20px;text-align:center">
Address
</div>
<div>
<div style="font-size:1.5em;color:green;font-weight:bold;line-height:1.5em;text-align:center" id="street"></div>
<div style="font-size:1.5em;color:green;font-weight:bold;line-height:1.5em;text-align:center" id="city">
</div>
</div>
</div>
</div>
Go to Zocademy for more
Comments

How to Connect Gmail to Zoho CRM

1/2/2020

Comments


If you have a Google for Business or Gmail email account, it couldn't be any easier to connect it with Zoho CRM.  This video shows you quickly how to connect it.

Pretty simple really.  If you're already logged into Gmail, it's a only a matter of authorizing Zoho to manage your emails.  That part takes seconds - maybe a minute.  Then you simply select if you want your emails to be private, custom or public for others to see.  Bam - done!

Why Connect the Two?

  • The first thing it does it automagically matches all emails in your email to matching contact or leads within the CRM - you don't have to go one by one and match them all individually - crazy simple
  • Next, you can use SalesInbox to manage your inbox intelligently instead of using the Gmail interface if you like.  From there you can quickly send and receive emails, create new leads and contacts, categorize your mail and more.
  • You can also use the Zoho Chrome Gmail extension if you would like to stick with using the Gmail browser interface - you can also add leads and contacts from there as well - additionally you can see information from the matching contact in Gmail, such as deals you're working, next task / appointment/ etc.
  • You can send email from any lead or contact easily - and use pre-created templates 

Summary

We've been around CRMs for a while and this is the easiest connection to Gmail - not to mention the other great email related features of Zoho CRM to maximize your day.

If you're new to Zoho CRM, we recommend you take our Quickstart Course to get going with Zoho One: www.zocademy.com
​​
schedule a one-on-one
Comments

    Archives

    January 2020

    Categories

    All
    Q&A
    Setting Up
    Tutorial
    Zoho CRM
    Zoho Forms
    Zoho Sites

    RSS Feed

The Edkins Group ©2022  All Rights Reserved | Tampa, Florida  |  813.680.5478
 Business Phone System |  Join the Group
  • Knowledge
    • Zoho Masters
    • Learn >
      • Zoho Video Tutorials >
        • Client Calls
        • Zoho Books Videos
        • Zoho Creator Videos
        • Zoho CRM Videos
        • Zoho Projects Videos
        • Zoho Sign Videos
      • Virtual School >
        • Get a Free Course
  • Pricing
  • Zoho
    • End to End Small Business System
    • Small Business Accounting
    • App Demo Pages >
      • Calendar Scheduling
      • Web Tracking and Chat
      • Maximize Your Website
      • Online Meetings
      • Email Campaigns
      • Social Media
      • Customer Tracking
      • Sale Team Motivation
      • Customer Help Desk
      • Accounting
      • Project Management
      • Agile Management
      • Email
      • BI / Analytics
      • Note Taking
      • Instant Messaging
      • Surveys
      • Train Your Team
      • Staff Recruiting
      • File Sharing
    • Start Your FREE Trial
  • AirCall